SketchUp Plans & Elevations Ready For Layout with FlexTools’ New Features
Thinking and designing in 3D are core principles of working with FlexTools in Sketchup. Exporting technical documentation from the 3D model to 2D plans and elevations is no less important!
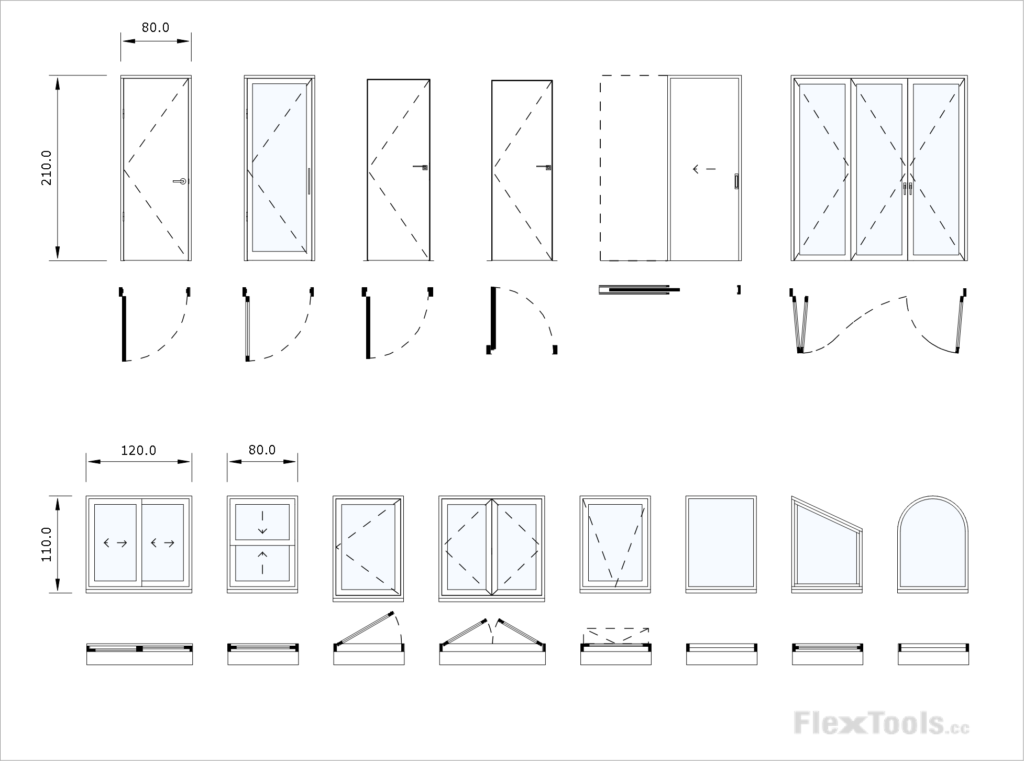
Door Positions & Quantum Superposition 
We've had countless requests to solve the (quantum superposition) problem of having doors both open in plan and closed in elevation at the same time!
On top of the need to keep opening and closing doors between scenes (Is the cat  alive?), when you would run sections through your doors and windows, often, it would look like there were no openings at all because of the black section lines running through them.

This is not Schrödinger's cat.
We offered a couple of workarounds, but none of them adhered to our other core principle: Working mindlessly fast!
So we're glad to introduce . . .
Doors Open in Plan and Closed in Elevation
All flex doors and windows can now be shown both open in plan and closed in elevation by simply turning on and off a few tags. You can now also make quick changes in 2D plan and elevation views.

Alternating between 3D, 2D Elevation and 2D plan scenes - Changes can be made in any view
Notice that the 3D components and 2D plan representations open and close independently, giving you more flexibility in presenting plans.

For the different types of views (3D, plan, elevation) we've added 4 new tags.

Turning tags on/off - Each tag combination is good for different views
- FlexTools - 2D Elevations - All 2D geometry for an elevation view.
* Includes the arcs from 'FlexTools - 2D Symbols' tag. - FlexTools - 2D Plan - All 2D geometry for a plan view.
* Includes the arcs from 'FlexTools - 2D Symbols' tag. - FlexTools - 2D Symbols - Arcs, swing directions and arrows. Can be shown with a dashed line-style.
- FlexTools - 3D - All 3D geometry for perspectives and elevations.
* Includes all 'FlexTools - 3D Hardware' tag. - FlexTools - 3D Hardware - Handles, locks and hinges.
Door Swing Directions
Panel swing symbols can be changed to the opposite direction.
The world is full of surprises. As it turns out, in some countries the symbols are backwards. 

Tips for Best Visual Results

Click to enlarge
To achieve crystal clear plans and elevations both in Sketchup and in Layout:
- Styles > Modeling Settings > Turn off 'Profiles' or set them to 1 - The model will also run much faster and, away with the Sketchupy cartoon look!

- Styles > Edge Settings > Set 'Section Line Width' to 1 - It will give a much cleaner drawing.

- Tags > 2D-Symbols > Assign the dashed line style - This will make arcs, swing directions, and arrows appear as dashed.

Generate Report Settings
A new feature for door and window scheduling using Sketchup's Generate Report tool is here!
We've added a set of 'Report Settings': Code, Type, Units & Size. Together with Material, they will make it really easy to extract basic window and door .csv file reports.

You can now set the Code, Type and Units for each window and door.

The new attributes for Generate Report: dyc:Code, dyc:Type & dyc:Size + Quantity.

Sketchup Generate Report Output ready for download
Many Improvements
There are many more improvements in this FlexTools update, to name a few:
- Totally revamped pocket door.
- New astragal in FlexDoor components.
- Toolbar and component options rearranged and regrouped for easier navigation.
- Hopper/Awning component's default handle position is now on top / bottom.
- Better default window and door sizes.
- . . .
See all the changes in the Release Notes 
Thanks
Many thanks to our customers who contributed their precious time over many emails with requests, ideas and suggestions that helped to realize this update:
 Jonathan Piette and Julian Smith, who sent us models with great suggestions and tips.
Adam Thurtell, who helped us understand and test ideas with the Condoc workflow.
Sam Demonteverde, Tony Simmonds, Kenny Brown, Tom Vallee, Ladislav Lukac and many more who challenged us with tough questions!
You rock, guys!
How to Easily Create SketchUp Plans with FlexTools?
The new FlexTools update simplifies the process of producing professional SketchUp plans & elevations. Here's a step-by-step guide on how to set up your SketchUp elevation views, and how to apply FlexTools tags to make the elevations more clear.
1. Prepare Your SketchUp Model
Place a section plane and move it to where you want it.
For 2D Elevations:
- Change the camera view to parallel projection ('Camera' > Parallel Projection').
- Pro tip: Assign a keyboard shortcut for 'Parallel Projection' to make this step faster in the future.
- On the section plane 'Right Click' > 'Align View'.
- OR: Use Standard Views - Go to 'Camera' > 'Standard Views', and choose the desired elevation (front, right, left, back).
- Additionally, you can get to these views through a toolbar. To turn on the toolbar navigate to 'View' > 'Toolbars' > 'Views'.
For 3D Elevations:
- Make sure you are viewing the model in perspective ('Camera' > 'Perspective').
- Find the camera view that is right for you by orbiting and panning around the model.
For 2D Plans:
- Change the camera view to parallel projection ('Camera' > 'Parallel Projection').
- Set the view to top view: Go to 'Camera' > 'Standard Views', and choose Top view.
- Pan and zoom until you get the view you want.
2. Use FlexTools Tags for Precise Control
The new tags control the visibility of specific elements within the different views. Here's how to leverage them for creating plans and elevations
Open the Tags panel ('Window' > 'Default Tray' > 'Tags').
For 2D elevation drawings:
- Turn ON the tags:
- '3D'
- '3D Hardware'
- '2D Symbols'
- '2D Elevation'
- Turn OFF the tags:
- 2D Plan
For 3D elevations:
- Turn ON the tags:
- '3D'
- '3D Hardware' (optional)
- Symbols
- Turn OFF the tags:
- 2D Plan
- Depending on the style you want to achieve in the 3D elevation choose if to turn ON or OFF:
- '2D Elevation'
For a 2D Floor Plan:
- Turn ON the tags:
- 2D Plan - this ensures that the doors will be presented as open.
- Turn OFF the tags:
- '3D'
- '3D Hardware'
- Depending if you want to see the door swing symbols choose to turn ON or OFF:
- Symbols
For a 3D Floor Plan and general views
- Turn ON the tags:
- '3D'
- '3D Hardware'
- Symbols
- Turn OFF the tags:
- 2D Elevation
- Depending if you want to see the door swing symbols or not choose to turn ON or OFF:
- 2D Plan
See exact descriptions of the tags above in the section on tag descriptions.
3. Create and Name your scenes
- Create a New Scene: Navigate to 'View' > 'Animation' > 'Add Scene'. This will save your current view as a new scene.
- Give the scene a name (e.g., "Front Elevation") to help keep your SketchUp file organized: 'Window' > 'Default Tray' > 'Scenes' > rename the scene.
- Go to 'Window' > 'Default Tray' > 'Styles' > Edit and explore the 'Modeling' and "Edge" settings. Consider turning off 'Profiles' or setting them to a low value for a cleaner, less "sketchy" look.
- Adjust the 'Section Line Width' under 'Edge Settings' for a more refined floor plan and clearer elevation drawings.
- Utilize the '2D Symbols' tag to assign a dashed line style to elements like swing direction arrows for a more elegant look.
Additional Tips:
- Utilize tags to maintain organization within your SketchUp model, especially when working with complex projects. On top of the tags that are assigned to the flex components, you can always assign your own additional tags.
- See further online tutorials and resources, like this full tutorial on SketchUp residence modeling, to delve deeper into SketchUp and FlexTools' functionalities.
Your feedback is extremely important to us!
Do you find the new 2D additions useful? Let us know!
*How to update? See here.
Frequently Asked Questions
Which versions of SketchUp can I use the FlexTools extension with?
SketchUp has a variety of different versions, including online (Free, Go), desktop (Pro, Studio) or iPad. However, extensions are only supported by SketchUp Pro and Studio desktop versions (PC or Mac).
How do I change the swing direction?
- In the Component Options look for a setting called: 'Swing Symbol'.
- With FlexTools' 'Flip Tool' you can change FlexTools door components swing direction easily between in-out and left-right, and on multiple doors at once. You can use it for flipping any component in Sketchup.
How do I turn SketchUp 2D elevation door swings on or off with FlexTools?
Under 'Window' > 'Default Tray' > 'Tags' - Turn on the '2D Elevation' and '2D Symbols' tags.
Can I show windows open in a SketchUp plan?
Yes, you can show windows open in SketchUp by rotating the window component around its hinge. Select the window, use the Rotate tool, and pivot it to the desired open position.
With FlexTools dynamic windows and doors you can open them with a simple click using the Interact Tool. This will work both for the 3D and for the 2D plan representation.